- Home
- How to Read House Plans
- How to Read Electrical Plans
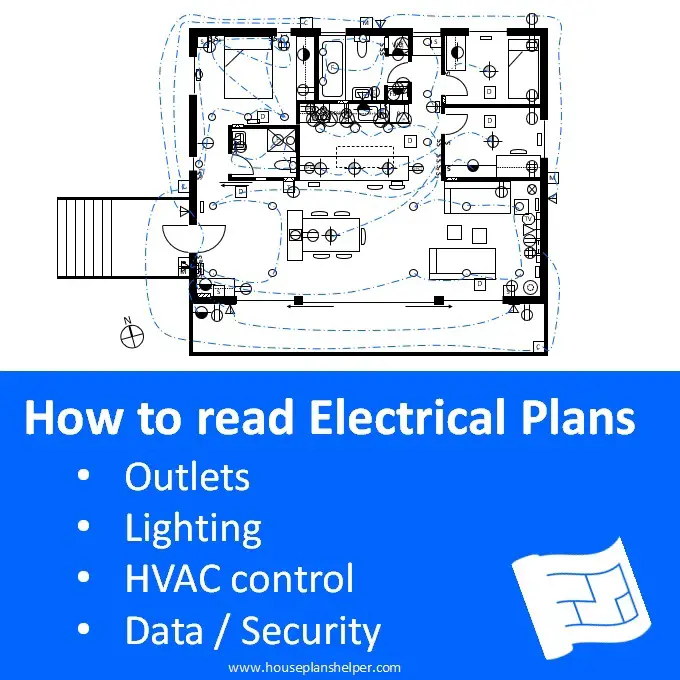
How to read Electrical Plans
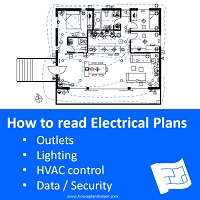
It's vital that you learn how to read electrical plans so that you can check that all the wiring and lighting you need to support your lifestyle is in place.
There's nothing worse than moving in to your new home and finding that you're missing the outlet you need or worse.
This page forms part of the how to read house plans series.
Electrical plans are essential documents for the trades and contractors that will be putting in all the wiring for your house. They need a plan to work from or they'll make decisions for you which may not be what you want.
On this page we'll cover...
- What is an electrical plan?
- Codes and standards
- Electrical plan symbols (covering electrical, lighting, data and other symbols)
- Sample electrical plan (outlets, lighting, data, comms, security systems etc)
What is an electrical plan?
When you're looking at how to read electrical plans, the electrical plan should contain everything that has an element of wiring which includes the following elements:
- Outlets - outlets for appliances and wall outlets in each room
- Lighting - the location and type of lights
- Data, comms & detectors (eg smoke and Carbon monoxide)
- Security system (sensors, cameras)
- Controls for HVAC (heating and cooling) system
- Going Wireless
The electrical plan won't go into detail about all the individual circuits required. You electrician and other contractors have the knowledge required to ensure a wiring scheme that meets your design and meets the safety requirements.
Speaking of which...

Codes and Standards
As you can imagine it is important for your electrical installation to be useful and above all safe. Here's a list of codes and standards that have been put in place.
The standards set out, among other things, the number and spacing of outlets required and the treatment of outlets in wet space.
I find it surprising how different the standards can be country to country.
- In the USA the standards are set by the National Fire Protection Association in the National Electrical Code.
- In Canada the Canadian Safety Association sets the Canadian Electrical Code Safety Standard.
- In the UK (England and Wales at least), the standard is set by Document P of the Building Regulations. There is also a charity dedicated to electrical safety in the UK - Electrical Safety First.
If your country isn't listed here, see what you can find out about the standard in your country. Remember that standards might be governed on a state level rather than country wide.
Your design professional and electrician should be familiar with the codes and standards in your area.
This page will point out some of the US standards but the intent is to make you aware of these standards rather than to be a reference for the standards.
Electrical plan symbols
If you want to know how to read electrical plans, the symbols you need are covered in the blueprint symbols section.
You can download a set of free blueprint symbols to print them out while you're reading through this page.
Sample electrical plan
We're going to use our sample home to look at how to read electrical plans.
The electrical plan is shown on top of the floor plan. I am an advocate for showing furniture on floor plans to allow you to properly judge how the spaces in your home will perform.
The location of furniture is also important to the electrical plan. Lighting should be arranged appropriately for the spaces and furniture. For example, you'll need a TV and internet outlet where you plan to have your TV and you'll need outlets for what you want by your bedside in your bedroom.
Sometimes when you're reading your electrical plan you might decide to make small changes such as the direction of a door swing. So it's worth learning how to read your electrical plans and reviewing them before you sign off on the design as a whole.
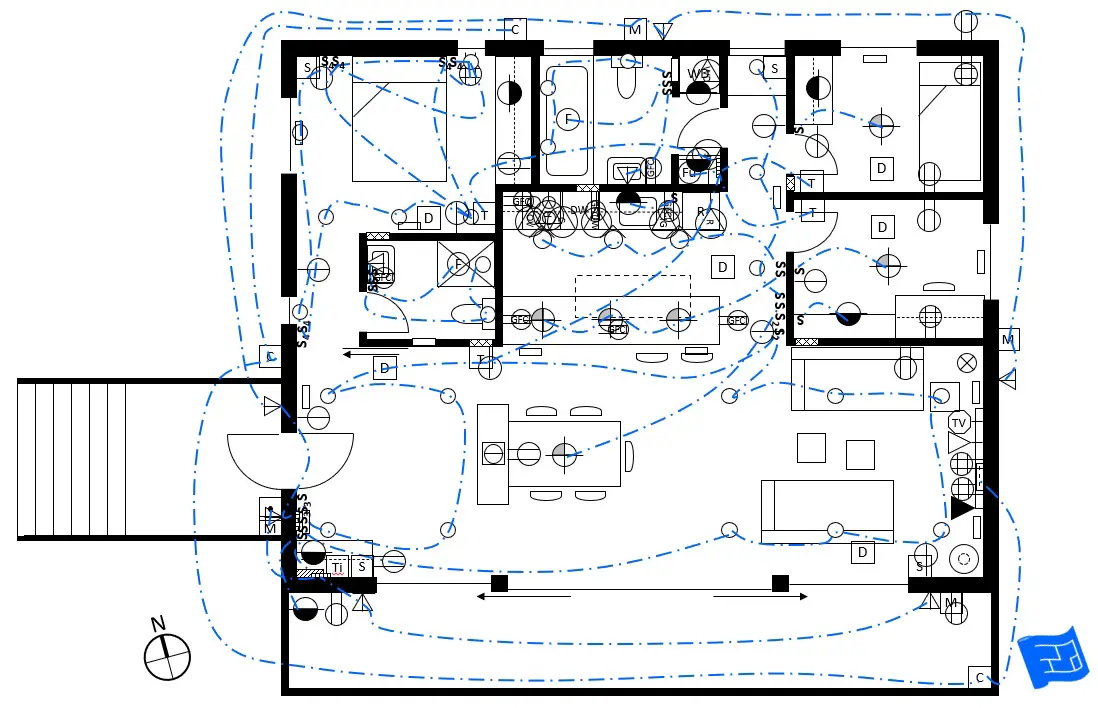
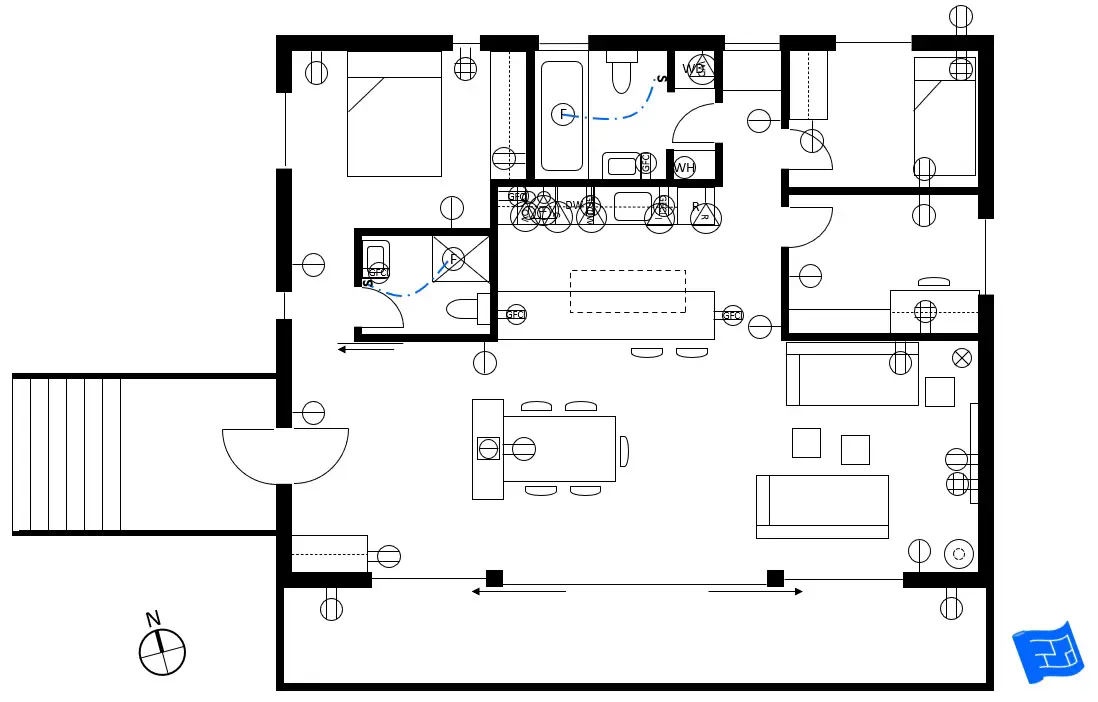
So here's the full electrical plan for our sample home.
The overall plan looks pretty complex.
Presenting the electrical plan on a webpage was a bit of a challenge. I made the symbols oversized so that they're easier to see.
It's a good idea to have one drawing with everything on it and individual drawings of each separate system are also useful.
It's valuable to see everything in one place so that you can see any conflicts between the systems. Different trades will also need an appreciation of how their part of the work contributes to the overall electrical plan and design of the home overall.
Drawings of individual systems makes how to read electrical plans easier to understand, system by system.

How to read electrical plans - Top tip for understanding electrical plans
If you're struggling to understand your plans, get your design professional or an electrician to help you with how to read your electrical plans.
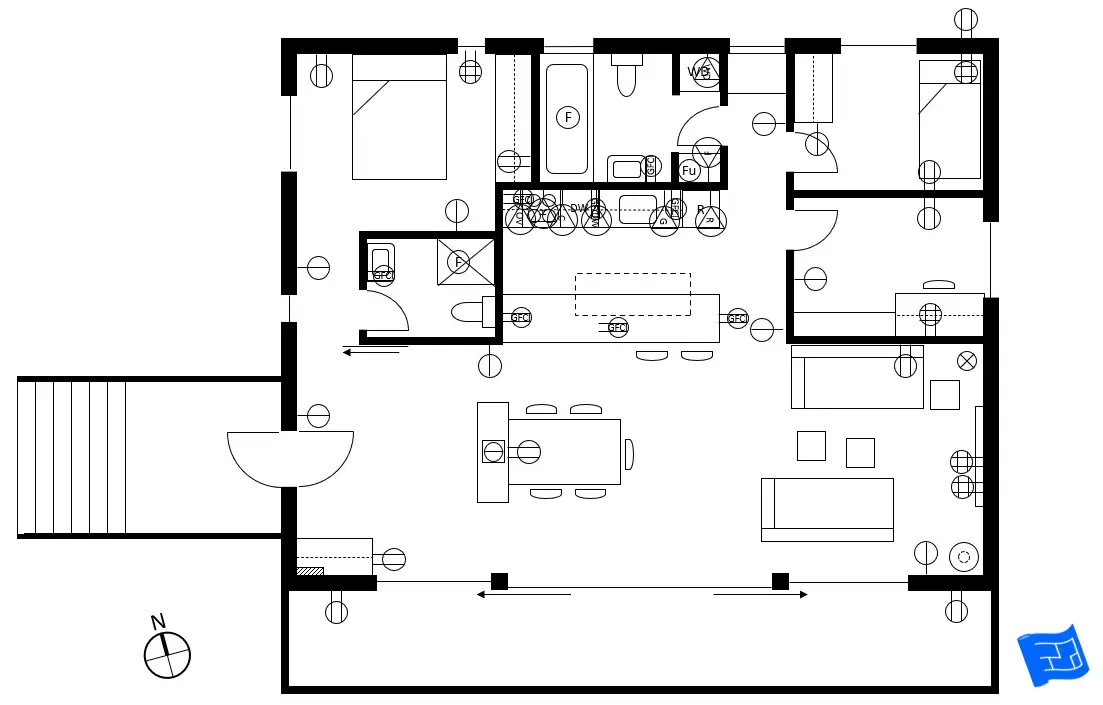
Electrical plan - outlets
The outlet plan has all the details of:
- Wall outlets (interior and exterior)
- Outlets for appliances (kitchen appliances, laundry appliances, bathroom fans, furnace)
- Main electrical panel
In the USA there is a '6 foot rule' for the spacing of outlets. This rule says that there should be no point along a length of unbroken wall greater than 2ft long that's further than 6 ft from an outlet.
Features that would constitute a 'break' in the floor lines are doors, floor to ceiling windows, stairs, fireplaces.
This means that the maximum distance between two outlets along a stretch of unbroken wall is 12ft.
Outlets can be installed at whatever height is most convenient for use. For example, in an office, it may be convenient to have an outlet in the wall above the top of the desk. It's worth noting in your electrical plan the height that you want the outlets installed, and note down any outlets that deviate from the default height.
Outlets in the main space
There are outlets spaced around the perimeter of the main space which includes the entrance, dining and living spaces. Here's a few points to note:
- The main electrical panel where the electricity supply comes into the house and the fuse box is located can be found inside the built-in cupboard by the front door.
- The cupboard where the electrical panel is located has an outlet built into it to the side.
- The dining space has a built in unit to the left of the table on the floor plan. There is a floor outlet to supply power to the built in unit. The intention of this is to supply power for a charger station.
- This piece of built in furniture also has an outlet pointing towards the table. This would be below the dining table and would provide an outlet for a laptop or anything else required for a hobby. This prevents wires trailing across a circulation space.
- Behind the media unit in the living space there are 8 outlets. These would be for the TV, phone, satellite box, games console, sound bar, wi-fi router, security camera hard drive and a spare.

Lamp outlet circuits
If you like you can specify lamps to be placed onto a circuit that can be operated from a switch on the wall. This can be useful to control several lamps in the living space at one time.
Outlets in the kitchen
The kitchen is an especially intensive place for outlets due to the all the appliances used either as permanent fixtures, or plugged in for use on the countertop when necessary.
There are a few rules about countertop outlets in kitchens.
- All countertop outlets need to have GFCI ( ground fault circuit interrupters) and AFCI (arc fault circuit interrupters) protection.
- Any countertop section 1ft or wider must have an outlet. A countertop can be considered to be broken into a section by a cook top or sink or similar obstruction. This is because even a small length of countertop can be useful for an appliance, but there needs to be an outlet for it to prevent cables needing to be brought across the back of the sink or the cook top.
- There should be an outlet at least every 4 ft. This means that no appliance cable will need to reach more than 2ft.
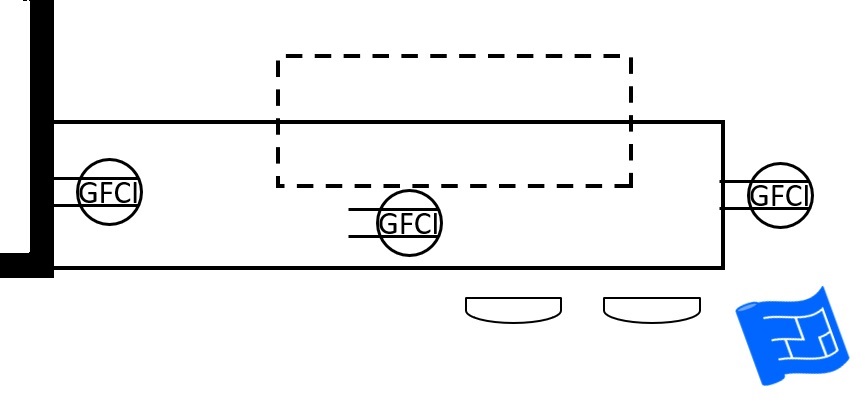
Next let's have a look at the outlets in the island.
Again there are rules about outlets in an island:
- At least one outlet is required for the first 9ft2 of your kitchen island.
- Then a further outlet is required for every additional 18ft2.
Out kitchen island is just over 28ft2 therefore 3 outlets are required. There's an outlet in the wall at one end, an outlet on the side of the island on the other and an in-counter outlet in the middle of the island.
See more on outlet options for you kitchen.
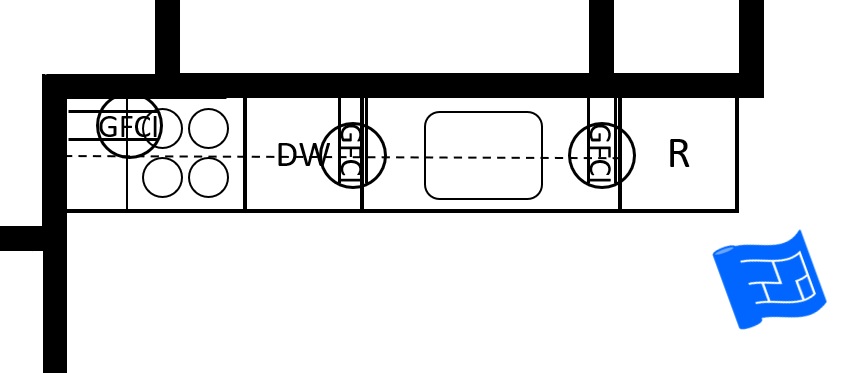
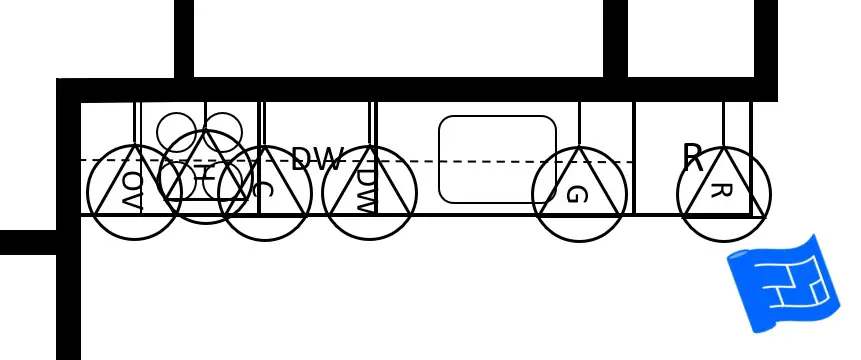
From the left we have outlets for the oven, the hood, the cook top, the dishwasher, the garbage disposal and refrigerator.
Again there are some rules for appliance outlets:
- Most outlets will require both GFCI ( ground fault circuit interrupters) and AFCI (arc fault circuit interrupters) protection but this depends on the code in your locale.
- In a new home, or a significantly remodeled kitchen, all kitchen appliances are required to be on their own circuit where necessary. In practice this means that most appliances will have their own circuit.
- It's a good idea to have isolation switches each appliance so that they can be switched off for maintenance or in an emergency. For ovens and cook tops, make sure that the switches are easily visible and accessible. It can be nicer visually to group them together rather than dot them here and there across the backsplash. Make sure you don't need to reach across the cook top to switch the cook top off.
Make a note on the electrical plan that sufficient slack should be included in the appliance wiring to allow the appliances to be removed clear of their housing and placed on the nearest surface (floor or counter) for ease of maintenance.
Spend time with your electrician to understand how they plan to set up the circuits and switches for your kitchen appliances.
Outlets in the bathroom
There is an outlet in each bathroom indicated as GCFI (ground fault circuit interrupter) which makes them safer for use in a wet space. These need to be placed within 3ft of the washbasin.
There is also a fan in each bathroom which will require power.
The furnace is located in the family bathroom and requires power.
Some outlets will need a switch, for example, bathroom fans can be switched off at the wall. The blue dashed lines indicate the connection between the outlet and the switch.
Note that the blue line is to group the outlet and the switch location together. It does not necessarily mean that this is the exact path the wiring will take.
Outlets in bedrooms
The bedrooms have appropriately spaced outlets around the perimeter. Additional outlets are required behind the bedside for a lamp, perhaps a radio or electric blanket. An outlet is popular if you want to charge your phone by your bed.
Outlets in the home office
The office has appropriately spaced outlets. The desk has a 4-gang outlet to allow for a computer and monitor, a lamp and a smart speaker.

How to read electrical plans - top tip - outlet and switch locations
Note that outlets and switches need to be screwed onto the framing so it may not be possible to match the exact location for each outlet and switch. If the location of any particular outlet is really important make a note on the plan so that the studs can be arranged, or a stud added to accommodate the exact position of the switch or outlet.
Electrical plan - lighting
Understanding your lighting plan is really important as your lighting is a huge design element in your home. It makes your home usable at night time and creates (or breaks) the atmosphere.
Take a look at the home lighting design series.
A lighting plan isn't complete without information about circuits and switches.
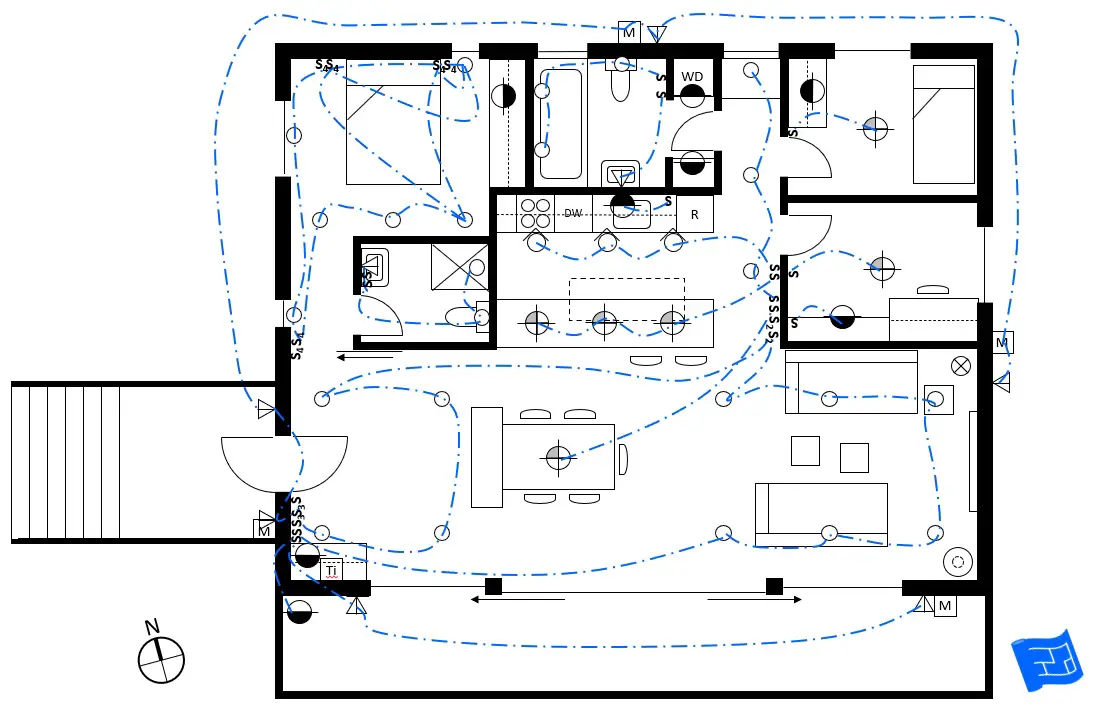
The blue dashed lines indicate which lighting fixtures are on which circuits and which switches operate the circuits.
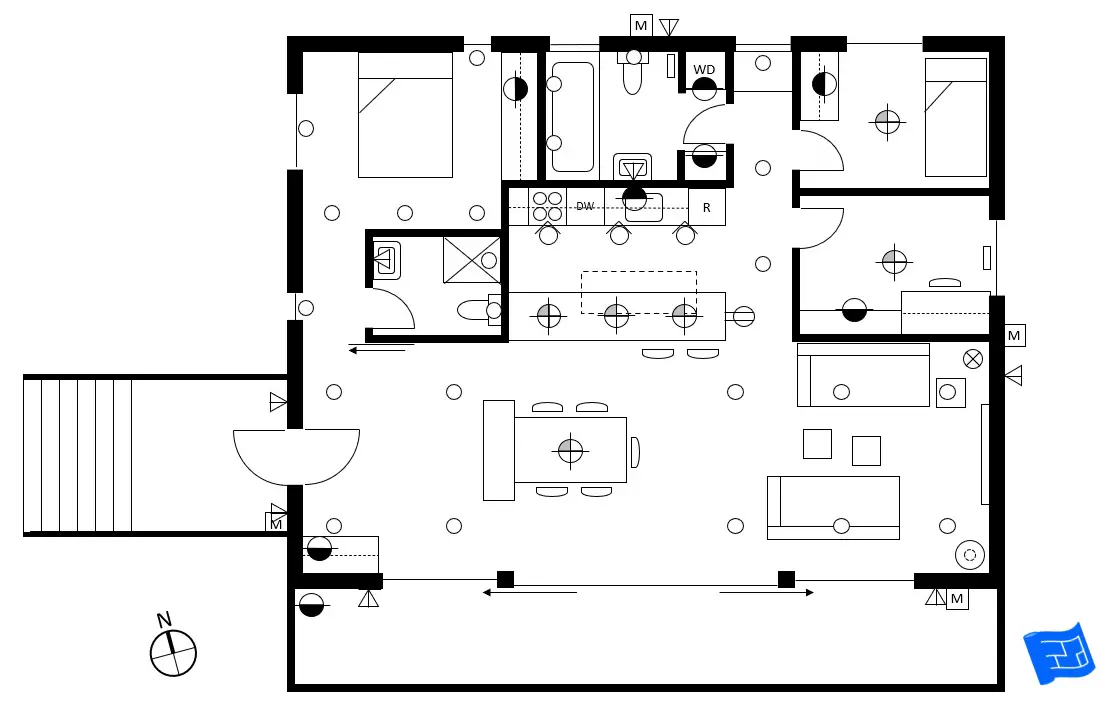
The sample home lighting plan shows several different types of lighting:
Lighting in the main space (entrance, dining, living)
The main space is split into three spaces - an entrance space, a dining space and a seating area.
- The entrance has four recessed lights which are operable from two places (three way switch) from beside the front door and from the wall just opposite the end of the kitchen island.
- The dining room has an overhead light over the table operable from the wall just opposite the end of the kitchen island. It can be useful to indicate the exact fixture and the height above the table it should be installed. See dining room lighting ideas for more on dining room lighting.
- The seating area has six recessed lights which are operable from the entrance and the wall opposite the kitchen island. See living room lighting ideas for more on living room lighting.
Kitchen lighting
- The kitchen has three overhead lights over the island operable from a switch no the wall opposite the kitchen.
- The same switch also operates the three directional recessed lights which shine on the units opposite the island.
- Under cabinet lighting is also indicated. I'd make a note that this should be an LED strip. This lighting is operated by a switch on the backsplash wall near the refrigerator.
See kitchen lighting ideas for more on kitchen lighting.
Master bedroom lighting
- In the master bedroom there are 3 recessed ceiling lights above each window and a set of three at the foot of the bed. These are on two separate circuits, each operable from three spaces (four way switch) from the wall at the entrance to the master and from each side of the bed.
- The bedside lighting will be with lamps plugged into the outlets shown on the outlet electrical plan.
- There's lighting inside the wardrobe which will be triggered when the wardrobe door is opened and closed without a switch.
See bedroom lighting ideas for more on bedroom lighting.

Explanation of 3 and 4 way switches
The naming of 3 and 4 way switches is a little confusing. The number refers to one more than the number of light switches that will be on the wall.
- A 3 way switch is a circuit which has 2 light switches in different locations and a light (or several lights) on the circuit.
- A 4 way switch is a circuit which has 3 light switches in different locations and a light (or several lights) on the circuit.
The symbols for a 3 way and 4 way switch respectively are S3 and S4.
Master bath lighting
In the USA, rules dictate that there must be at least one ceiling light operated by a switch.
- The master bath has two recessed lights, one above the shower and one about the toilet.
- There's a light over the mirror.
- All bathroom lights need to be wet rated.
See bathroom lighting ideas for more on bathroom lighting.
Family bathroom lighting
- The lighting arrangement is the same in the family bath as in the master bath with the exception of two recessed lights over the bath.
Bedroom lighting
- The bedroom has an overhead light operated by a switch by the door.
- In addition there's LED lighting in the wardrobe operated by the wardrobe door opening.
- Bedside lighting would be with a lamp plugged in to the the outlet indicated on the outlet plan.
Office lighting
- The office has an overhead light operated by a switch by the door.
- There is also lighting on the bookshelf which is operated by a switch within the bookshelf.
Exterior lighting
- There are two wall lights by the front door operated by a switch just inside the door.
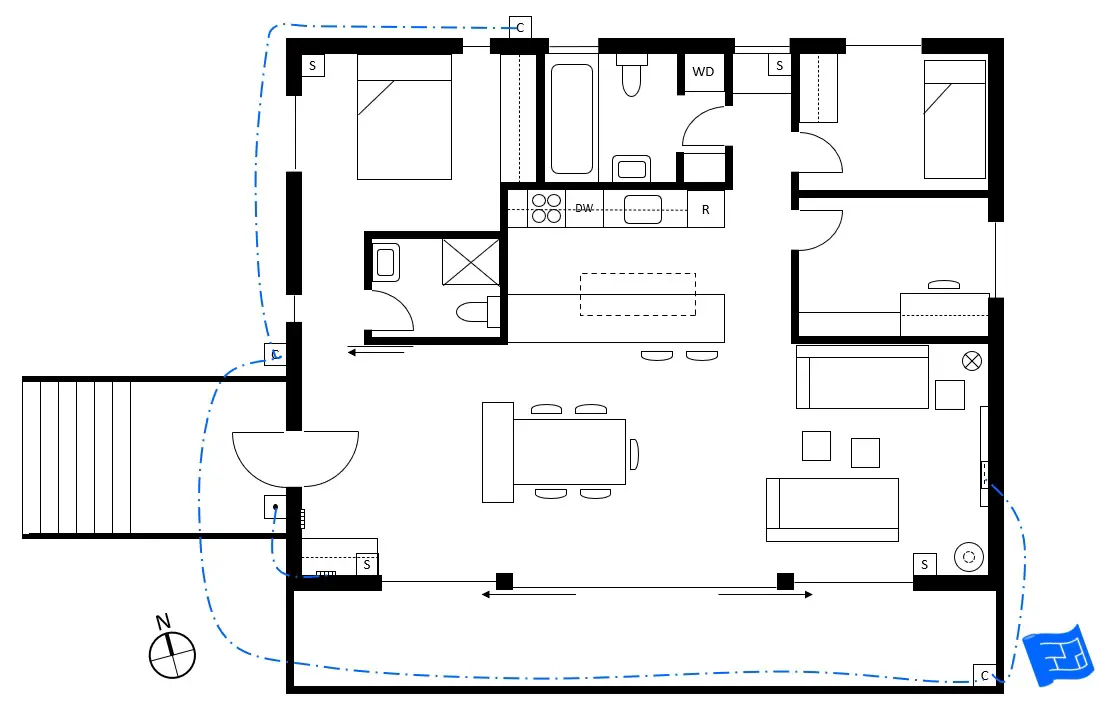
- There are also two wall lights on the balcony operated from just inside the front door. The balcony also has LED lighting which will run the length of the balcony rail operated from the same location as the other lights.
- There are two further exterior lights on the other two sides of the house. All the exterior lights are wired into sensors so that they can function as security lights at night time.
Garden lighting
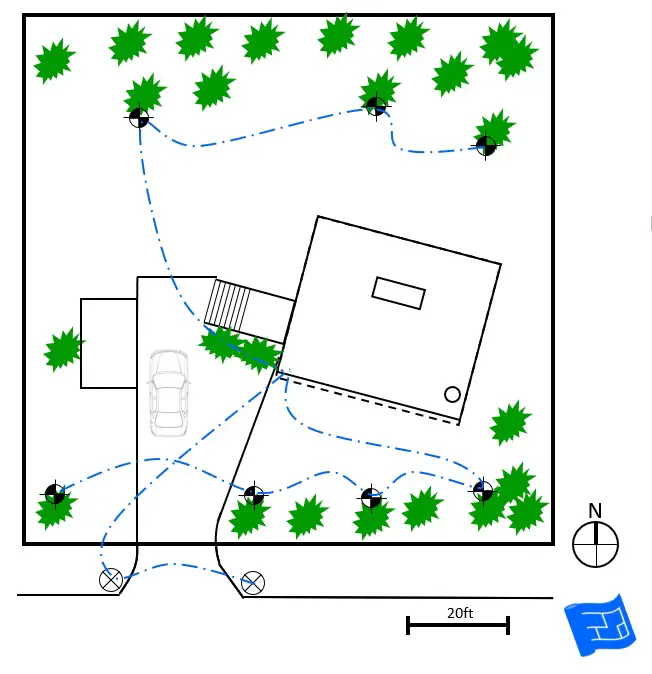
- In the garden there are two lights at the entrance to the driveway and some uplighting for the trees. These lights are controlled by a timer which sets the time at which the lights go out in the evening and come on in the morning. The timer also ensures that then lights only activate when it's dark. The timer can be overridden.
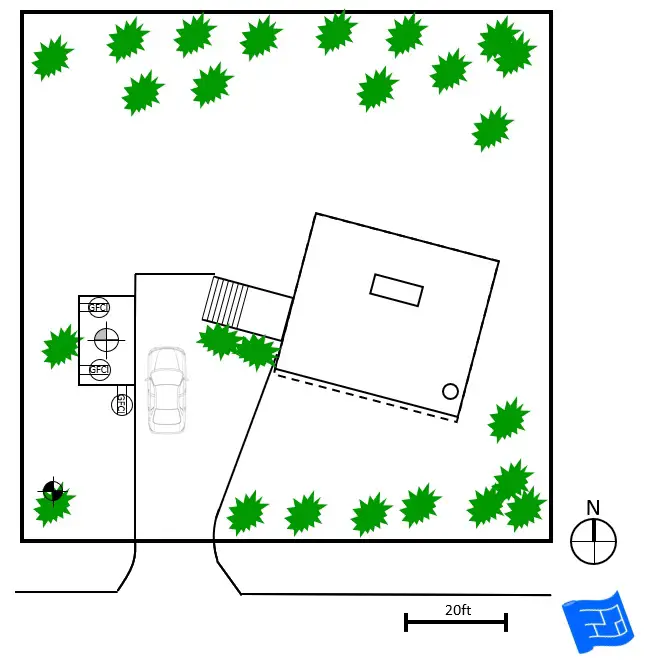
- The shed will also need power for outlets and lighting. This power would be run underground from the house power supply.
- If this home had gates at the entrance, wiring for power and intercom would need to be specified on the plan.

How to read electrical plans - Top tip for lighting
Having your interior lights on a dimmer switch makes it easy to create different moods. Make sure there's a note in your lighting plan, or special switch symbols, to indicate that the interior lights should be dimmable and on dimmer switches.
Electrical plan - Data, Comms & Detectors
Now it's time to look at wiring for the internet, phone, TV and detectors.
The internet, TV and phone points are all located along the living space wall opposite the front door.
The internet, TV and phone services would be fed into the house from the exterior behind the TV. Since there's no requirement for TV, internet or phone points in other rooms there's no requirement for dashed lines to indicate further wiring for these services.
There will be a wi-fi router placed in the media unit to provide wi-fi throughout the home.
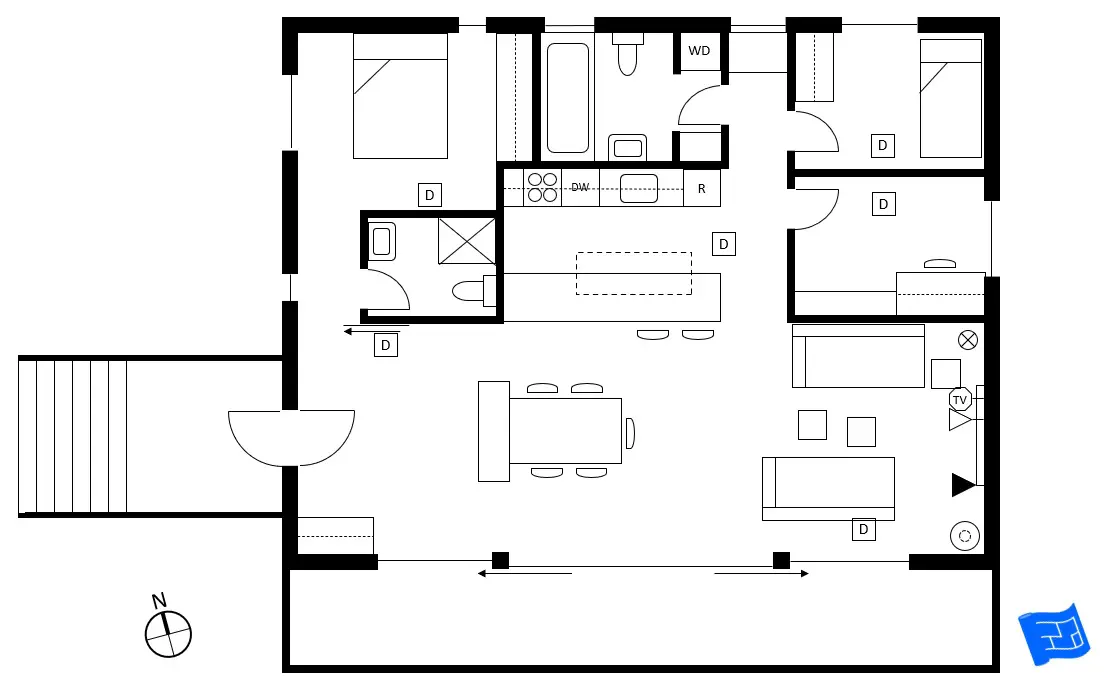
Homes require detectors for smoke and carbon monoxide. This home uses a 2-in-1 detector. The locations of the detectors are marked with a D.

How to read electrical plans - Top tip
Make sure the electrician that works on your build is familiar with working on residential projects. The regulations for residential and commercial electrical installations are different and it makes sense to have an electrician who knows their stuff.
Electrical plan - Security system
Most homes have a security system. Elements of the system might include
- Doorbell or intercom
- Camera sensors inside the home
- Window sensors (not included in the sample home)
- Outdoor security cameras. Exterior lighting controlled by a movement sensor (covered in the lighting plan section also plays an important role in security.
- Driveway gates (not included in the sample home)
- Panic buttons (not included in the sample home)
- The sample home has motion sensors and the alarm panel is just beside the front door.
- There's also some exterior cameras with a hard drive in the media unit in the living room media unit.
- And not forgetting a door bell wired to a speaker above the built in closet by the door.

How to read electrical plans - Top tip
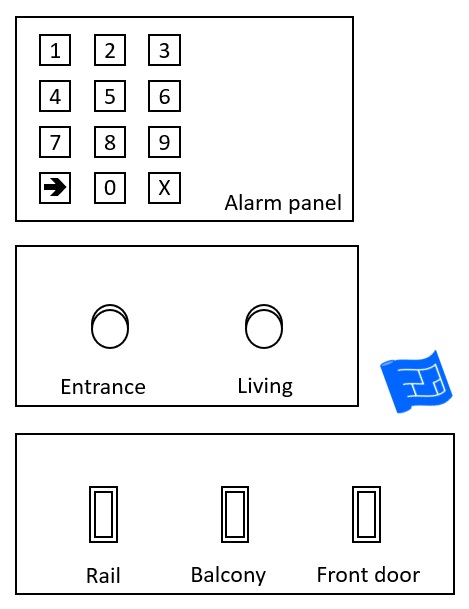
The area beside the front door is getting pretty crowded:
- Exterior lights by front door
- Exterior wall lights on balcony
- Exterior balcony rail lights
- Entrance area lights (interior)
- Living area lights
- Alarm panel
There's nothing wrong with having the controls for several lights or systems in one place, in fact I think it often makes sense to avoid lots of walking and to avoid having switches all over the place and creating 'wall acne'. The organisation of the panel on the wall is really important and the layout of the switches needs to be intuitive.
It can be worth setting out exactly how the switch panel should be set out.
Electrical plans - HVAC / heating control
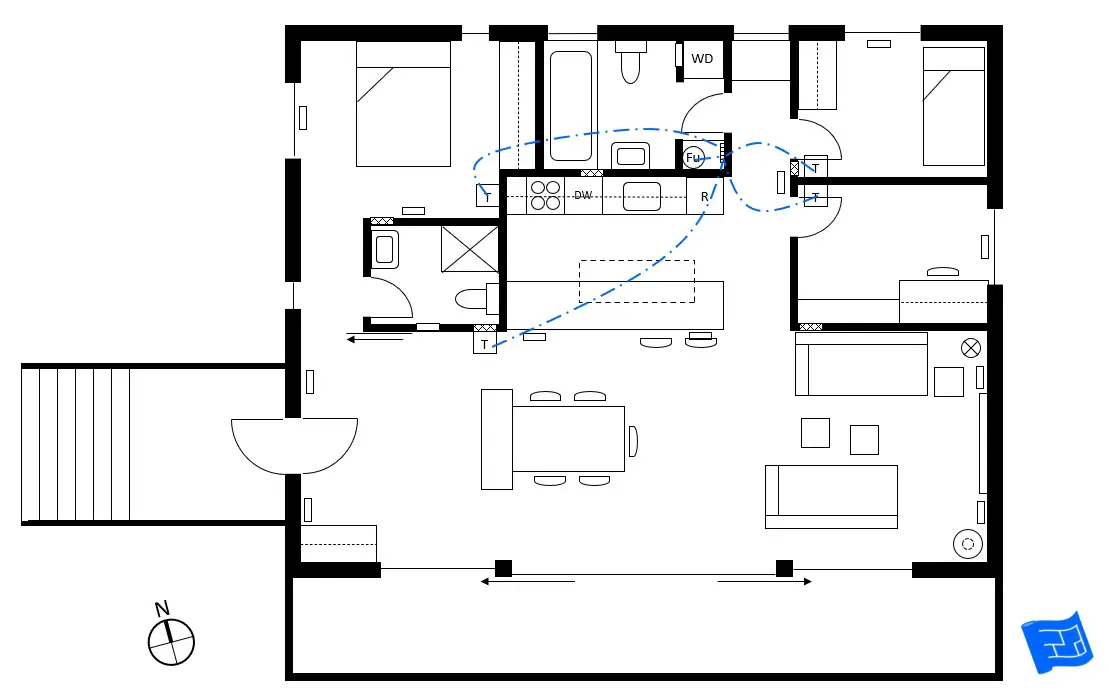
Your HVAC or heating system might seem a strange thing to include on the electrical plan but your furnace, water heater and thermostats all need to be wired.
I've also put in the locations of the vents or registers and the return vents. It's a good idea to review the location of these too (even though they're not strictly electrical)! The supply registers should not interfere with curtains or furniture. The return vents should not interfere with where you might want to hang art or a mirror.
Our sample home is using a hydronic furnace which heats water instantly so there's no requirement for a hot water tank. The furnace is located in a cupboard just by the entrance to the family bath.
There are thermostats in the living space and in each room which connect up to the HVAC control panel.
The HVAC control panel is located in the cupboard in the bathroom next to the furnace.
Sometimes electric heat mats in bathrooms which require wiring might be specified, but not in our sample home.

Going wireless
With faster internet and wi-fi and the internet of things ever growing, more and more systems are available in wireless configurations, in particular:
- Security systems
- Sound systems
- TV streaming services
- Lighting control
- HVAC / heating control
Remember that the wireless nature of these systems is simply communication only. Power is still required to power a camera, a speaker, a TV, a light bulb and a furnace / boiler. Sometimes this can be done with a battery, but it can be preferable to have most items that require power wired in.

