- Home
- Kitchen Design
- Kitchen Island Designs
Kitchen Island Designs
I have spent many happy hours analysing kitchen island designs and deconstructing them so that I can give you a summary of the different design options.
A kitchen island is a really useful addition to a kitchen and might be used for any number of activities:
- Food preparation
- Sitting round the island to keep the cook company
- Eating
- Homework
- Reading the paper or your tablet
- Extra storage
When you're considering your kitchen island design it's important to think carefully about how you will use your kitchen island and choose the design options that will best support the way you want to live in your kitchen.
On this page we'll first discuss the elements of kitchen island designs. The idea is to talk about the different options available so that you can pick and choose the combination that will work best in your kitchen. The examples are all for rectangular islands but go ahead and use your imagination to apply the principles to the shape of island that you're planning.
I've illustrated the ideas as they would appear on a plan from the top down and in section as if someone had cut the island in half.
It's a long page so you can skip right to the kitchen island designs or other section that you're interested in.
- Elements of kitchen island designs
- 1ft / 30cm deep kitchen island designs
- 2ft / 60cm deep kitchen island designs
- 3ft / 91cm deep kitchen island designs
- 4ft / 1.23m deep kitchen island designs
- More kitchen island shapes
- Examples of kitchen island designs
I recommend taking a look at the kitchen dimensions page to familiarize yourself with the clearances that a kitchen island needs under different circumstances.
The kitchens with islands page suggests some overall kitchen layouts which include an island.
This page is part of the kitchen design layout series.

Elements of Kitchen Island Designs
Here are the main elements of kitchen island designs that I played with to come up with the designs on this page.
Kitchen Island Depth
Kitchen island designs are driven largely by cabinet depth. If you’ve ever spent time over on the kitchen cabinet dimensions page you’ll have seen that base cabinets are usually 2ft (60cm) deep. This page includes some options that combine base cabinets and half base cabinet depth. Check with your kitchen manufacturer to see what depths the base cabinets are available in. Sometimes wall cabinets which are 1ft (30cm) deep can be 'hacked' by a good kitchen installer for use as the base of an island.
Kitchen Island Length
Kitchen islands can be any length to suit the design of your kitchen. What you need to find out is whether or not there is a maximum length for the material you are considering for your the countertop of your island. In Europe many countertops can be ordered in lengths up to 3m 20cm. You can of course have an island longer than this but there will be joins involved in the surface material. You can make joins less obvious by changing materials and/or changing height.
Storage Orientation - Door and Drawer Arrangements
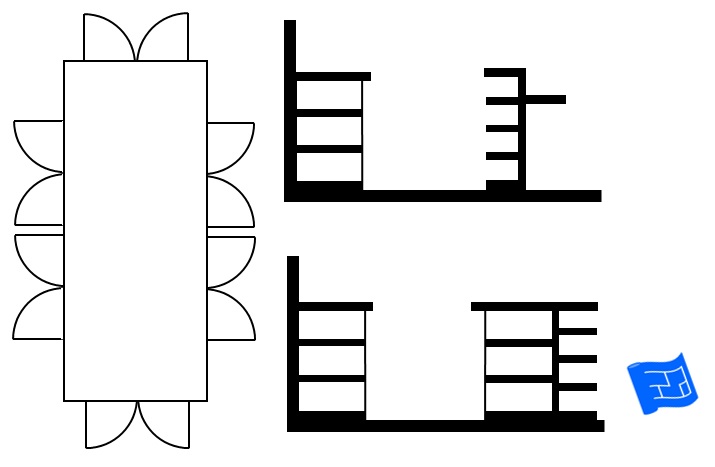
When you're planning out your island think about how you want to orientate the storage. This dictates the door plan. On this page I have included door plans to keep it simple. Remember you can have a single or a set of drawers as part of a base cabinet.
Kitchen Island Height
In the main, all islands will have some surface area at the same countertop height as the kitchen surfaces. For the part of the island that serves the seating area there are three generally accepted height options which are (smallest to tallest) table height, countertop height, bar height. Just remember to buy barstools that are the correct height for the surface height that you choose.
A change in height can be a great way to add a new material to your countertop.
You could change the height of the surface serving the seating area…
- the entire length of the island
- part of the length of the island
- the entire length of the island and the sides
All countertop height
Having the whole island at kitchen countertop height (36 inches / 92cm) is a popular option. It gives a sense of continuity and doesn’t create any visual barriers between the kitchen and the surrounding areas.
Raising the bar
Raising part of the island to bar height (42 inches / 107cm)is also a popular option. The beauty of this design is that all manner of mess can be hidden behind the raised portion so that your dirty dishes needn’t be on display to the adjacent space.
Turn the tables
Sometimes you want both and island and a table in your kitchen and there isn’t quite room for both. Having a table (height 30 inches / 76cm) as a continuation (albeit with a change of height) of the island can be the solution to this problem. A change in material as well as height can make the table feel more separate from the island if that’s what you want.
Kitchen Island Design Options
Kitchen island designs - 1ft / 30cm deep
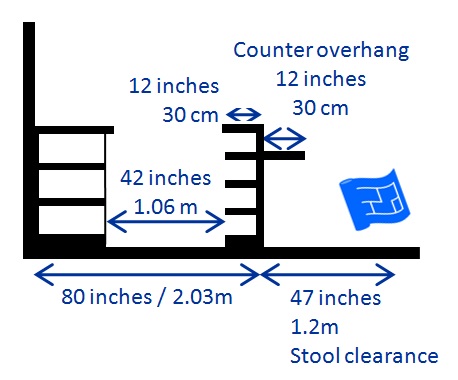
The first depth option is to make a kitchen island with some cabinets of wall cabinet size. Check what depth of base cabinet is available from your kitchen cabinet manufacturer.
Here's what a 1ft / 30cm kitchen island design would look like on the floor plan.
It’s fair to say that this would be a very thin kitchen island. In fact it serves more as a space divider rather than an island as such but it does still provide a useful surface which can augment the counter space in a kitchen. Since it’s thin, it needs to be bolted down to the floor very firmly to prevent it falling over. I have come across kitchen islands of this depth in several configurations. We'll take a look at them now.
Here's the 1ft deep island in it's simplest form where the shelves are facing the kitchen and there's a flat countertop with no overhang apart from the lip that extends over the cabinets.
Then if we just spin the island around the shelves face away from the kitchen providing some storage to the living space.
The next design element that's added here is a vertical divider.
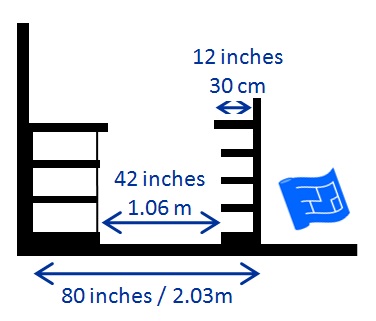 A divider added to the top of this 1ft / 30cm deep island hides the surface of the island from the space beyond the kitchen
In the first example, the divider shields the countertop (hides any mess) of the island from the area beyond the kitchen.
Equally, this arrangement can be reversed to present the shelves and the countertop to the area beyond the kitchen.
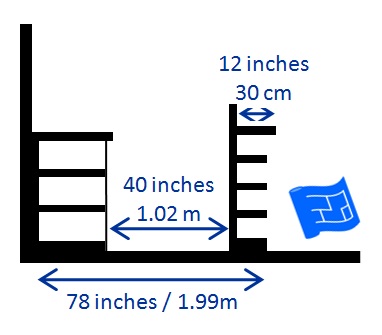 A 1ft / 30cm deep kitchen island with shelves and surface facing toward the area outside the kitchen
If we play with this arrangement we can make the shelves available for kitchen storage and the countertop directed to the space beyond the kitchen.
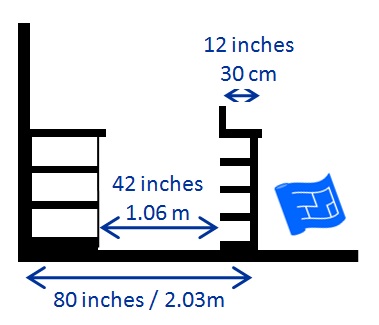 A 1ft / 30cm deep kitchen island with shelves facing the kitchen and countertop facing toward the area outside the kitchen
And if we reverse this we have the shelves available for storage outside the kitchen and extra countertop space available within the kitchen.
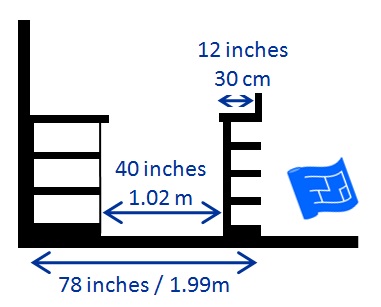 A 1ft / 30cm deep kitchen island with shelves facing the area outside the kitchen and with extra countertop space for the kitchen
Another way of creating a visual barrier is to raise the height of the island itself to bar height.
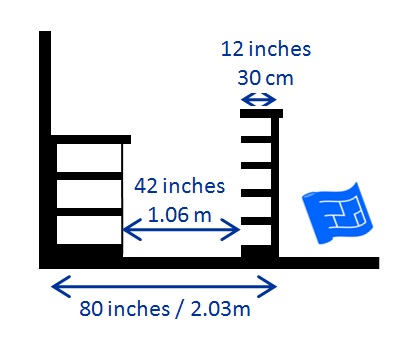 A 1ft / 30cm deep kitchen island raised to bar height to create a visual barrier between the kitchen and the area outside
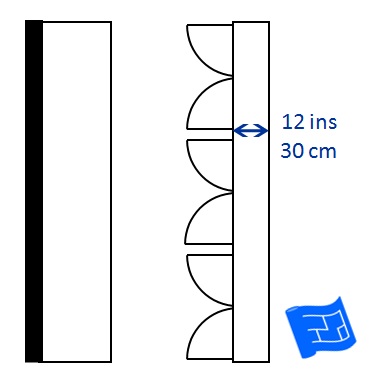
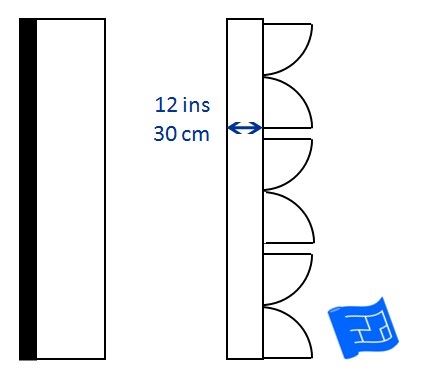
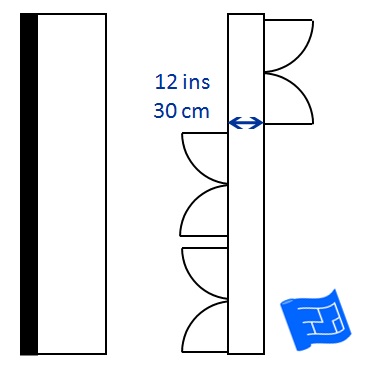
There are a few different configurations for doors with a 1ft / 30cm kitchen island.
The most obvious is with all the doors opening towards the kitchen.
Or if storage is more useful to the area outside the kitchen, the doors can be placed on the other side.
Or you can choose an arrangement using both sides.
Here's a space saving idea. How about building a bench on the back of your island?
Kitchen island designs - 2ft / 60cm deep
The next size up is to make an island out of a run of base cabinets.
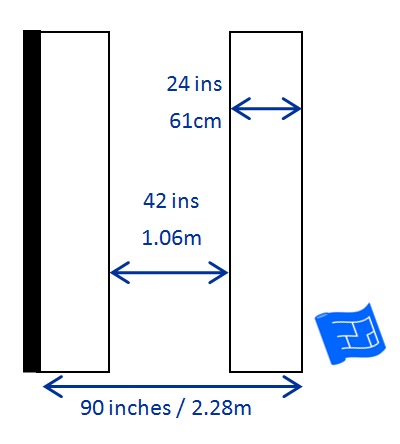
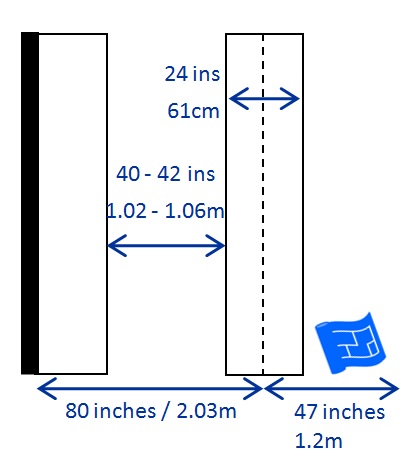
Here's what that would look like on the floor plan.
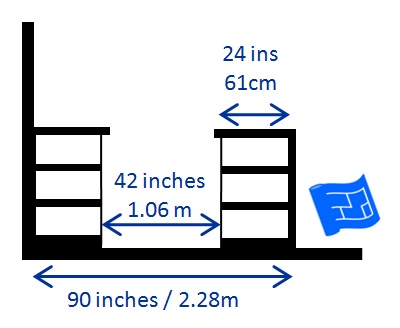
And in cross section...
A divider can be added to prevent the countertop being used as a set down place for the area outside the kitchen, and to shield the view of the kitchen.
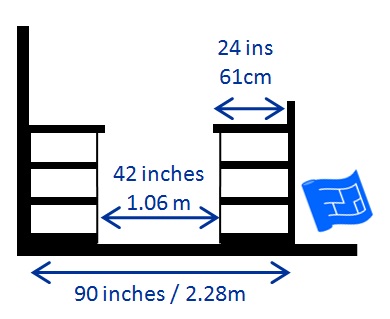 A divider added to the top of this 2ft / 60cm deep island hides the surface of the island from the space beyond the kitchen
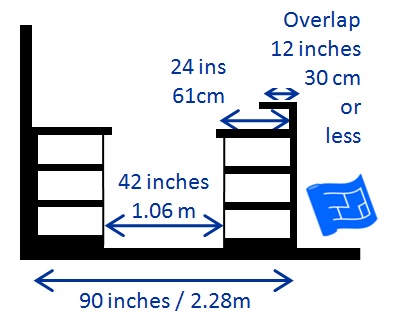
Another surface at bar height can be added to overlap the surface of the island to give more counter space.
All the examples above have the shelves facing in towards the kitchen, but you can choose other configurations.
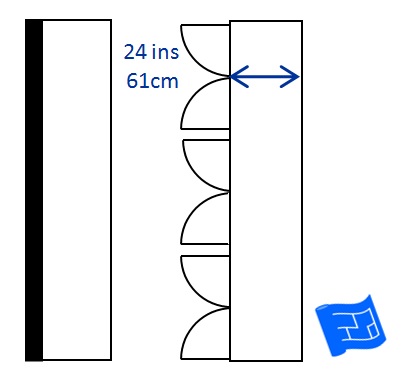
First of all, here's how the doors would look with all the shelves facing the kitchen.
You could opt to have some of the shelves facing out into the area beyond the kitchen.
How about incorporating some storage at the short ends of the island?
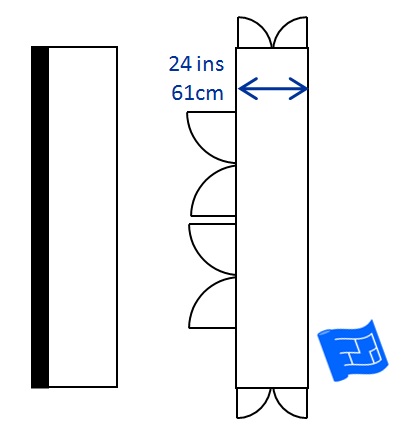 Door plan for a 2ft / 60cm deep kitchen island with the shelves included on the thin ends of the island
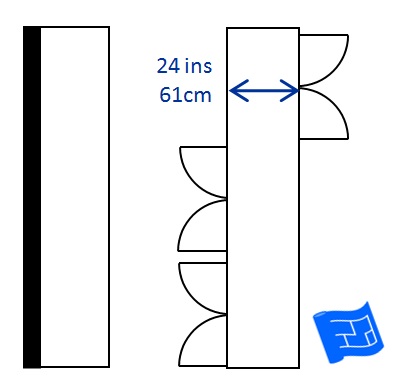
Another alternative is to half the storage depth and allocate half to each side.
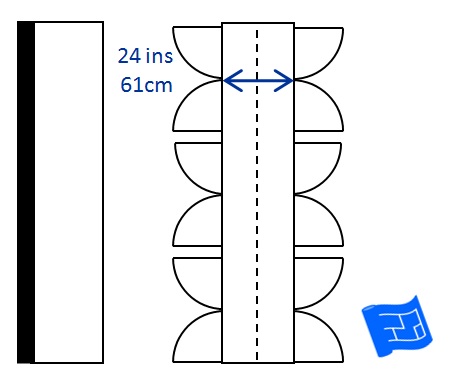 Door plan for a 2ft / 60cm deep kitchen island with the storage depth split between the kitchen and the area beyond the kitchen
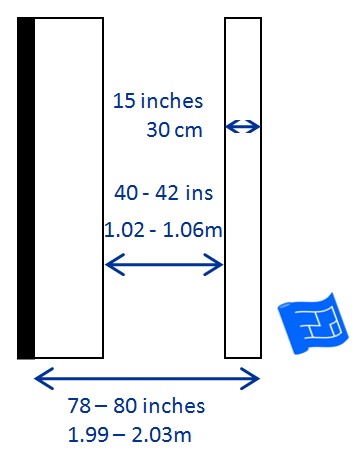
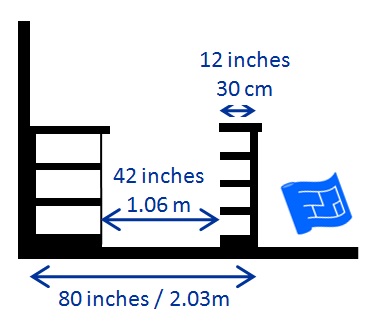
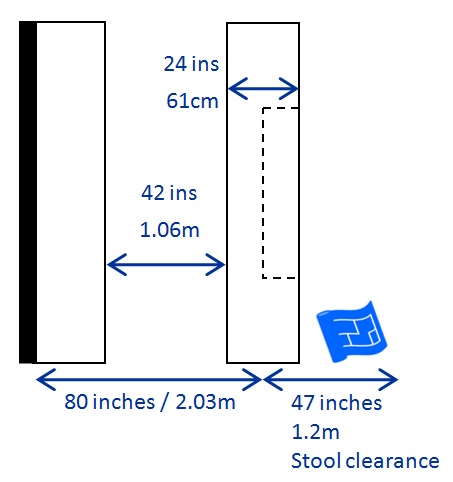
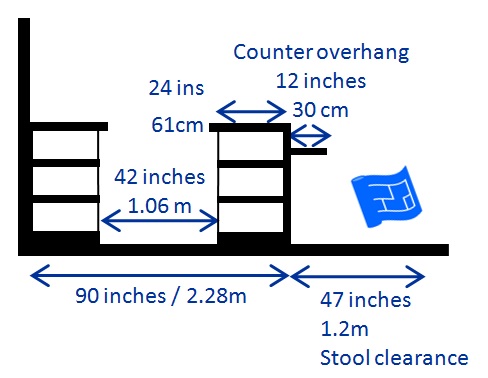
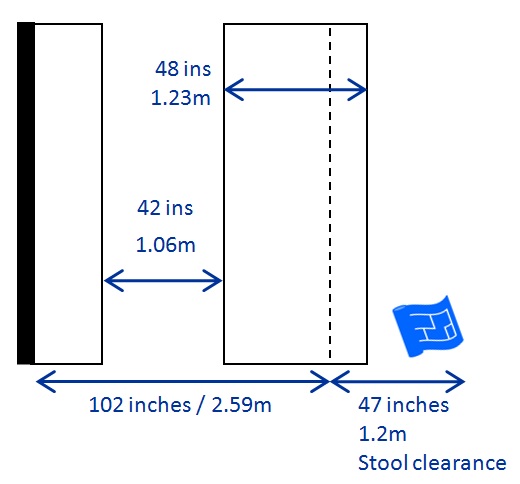
Now let's look at 2ft / 60cm deep kitchen island designs that include the use of 1ft 30cm base cabinets in order to create an overhang which acts as legroom for seating. The dotted line in the plan view below shows a 'cut out' area that is created by using 1ft / 30cm cabinets along that section.
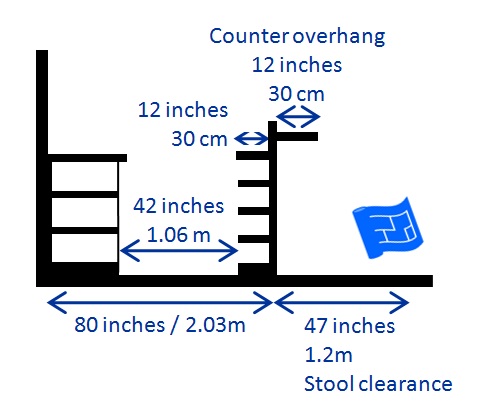
Let's have a look at this in section view.
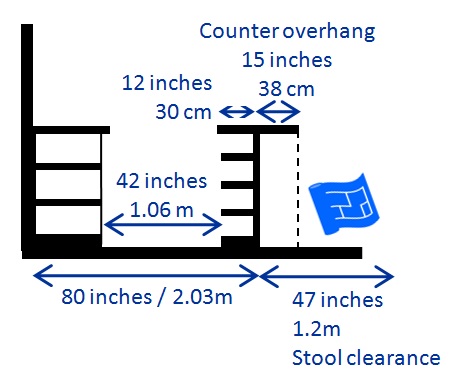 Section view of a 2ft / 60cm wide island constructed with 1ft / 30cm shelves along part of it's length to create room for seating
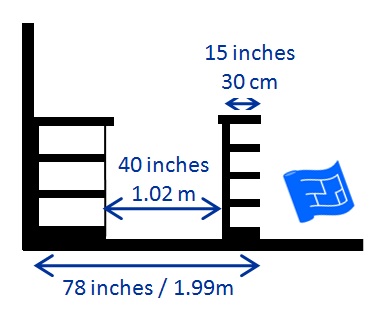
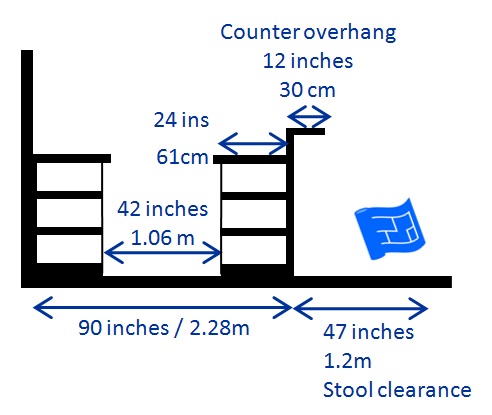
Another option is to have an overhang the entire length of the island.
And in section view below. Now, you can see that the total depth of this island is slightly greater than 2ft / 60cm. Strictly speaking to allow for the most comfortable clearance for seating an overhang for 15 inches / 38cm is required.
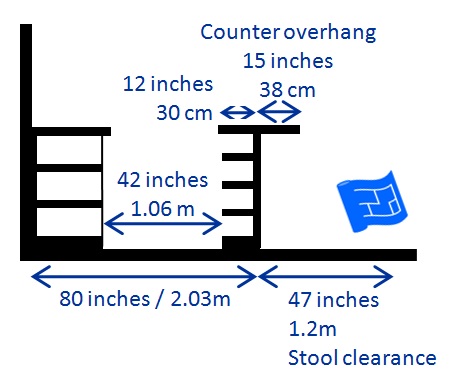 Section view of a slighty wider than 2ft / 60cm deep island with seating the whole length of the island
How about turning the shelves to present to the area beyond the kitchen? This can be a little bit impractical because stools have to be moved to access the storage, but if there is already enough kitchen storage, it might make more sense to orientate the storage this way.
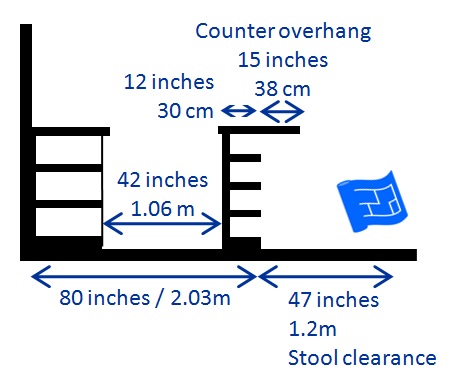 Section view of a slightly wider than 2ft / 60cm deep island with seating the whole length of the island and with shelves facing the area beyond the kitchen
There are options with the surface height of the seating are as well. You can take the surface height to bar height which would create more of a barrier between the kitchen and the area beyond the kitchen.
The vertical edge at the back of the 'breakfast bar' is important to avoid objects being accidentally pushed into the kitchen side of the island.
Equally, tabletop height is another option for the surface height of the seating area.
Another idea worth considering is including some overlapping surfaces.
In the example below the surface height of the seating area is at bar height. Another shelf has been added on top of the divider which increases the flat countertop space available.
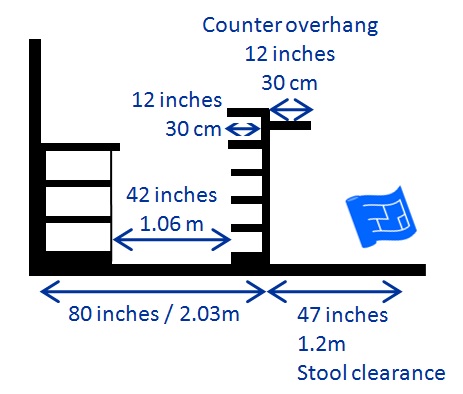 Section view of a 2ft / 60cm deep island with seating area countertop at bar height, plus an overlapping surface on the kitchen side providing more countertop space.
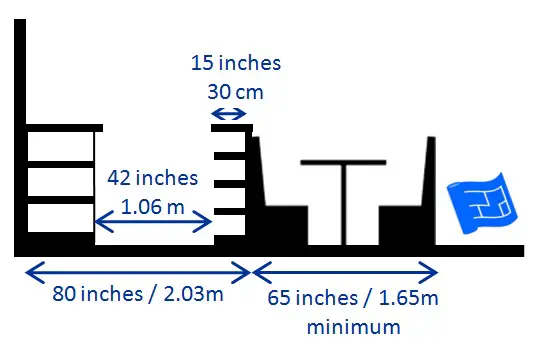
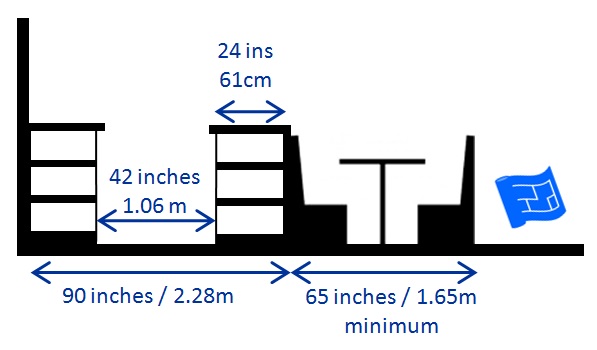
A booth built on the back of a 2ft / 60cm island would need an additional 65 inches / 1.65m.

On the edge
One of the decisions to make about kitchen islands is what to put at the ‘thin’ sides of the island. Is it better for your kitchen design to have the storage opening only along the length of the island, or does it make more sense to have cabinets opening along the thin edge on one or both edges?
How about an overhang for seating on the edge of the island?
Kitchen island designs - 3ft / 91cm deep
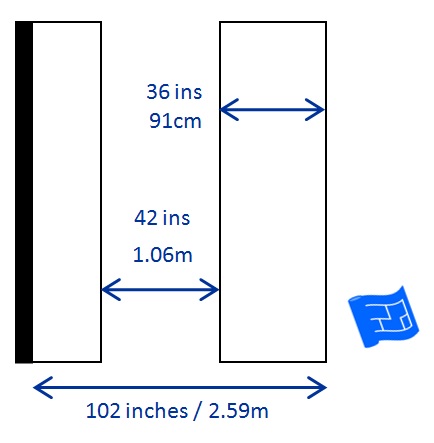
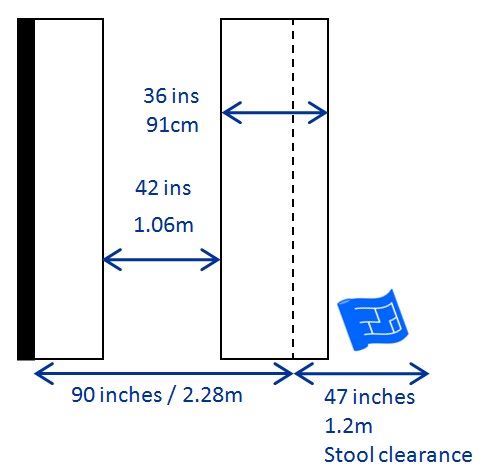
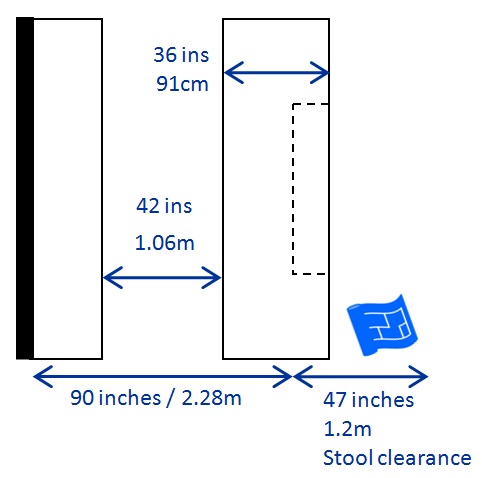
Now we move along to 3ft / 91cm deep islands. Here's what that would look like in plan.
If you choose to make the island entirely storage you can pick which side has the deepest cabinets. The dotted line represents where the storage is split.
Here's what the arrangement above would look like in section (or side on view)
Here's a couple of other arrangements on the theme above with varying surface heights for the countertop heights for the area beyond the kitchen.
First let's look at what table height looks like.
And if we try bar height...
Or the storage could be the other way round.
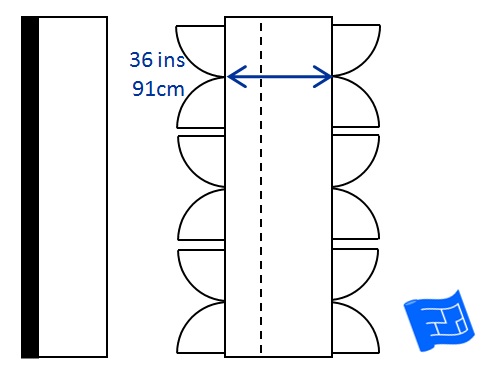 Door plan for a 3ft / 91cm deep island with the deeper storage oriented towards the area beyond the kitchen
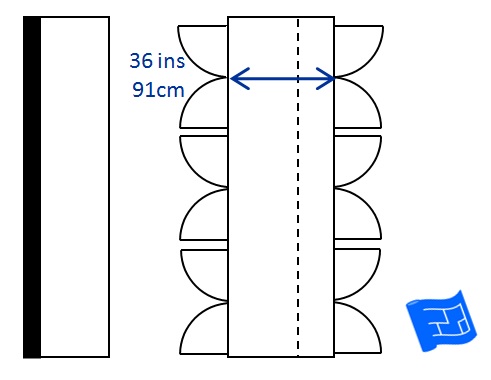
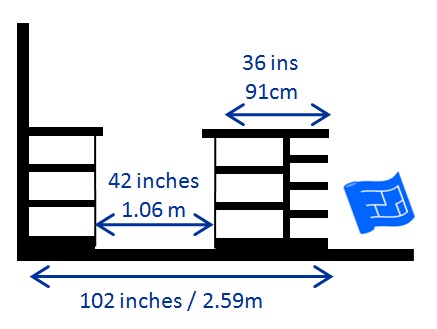
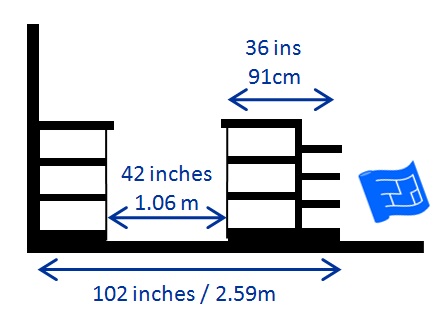
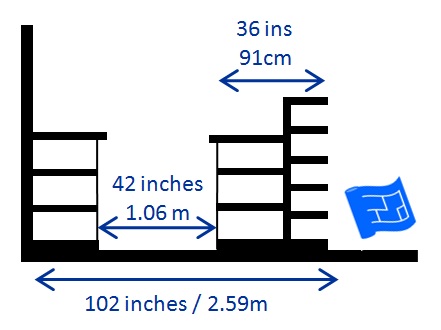
Perhaps the most popular arrangement for a 3ft / 91cm deep island is to use base cabinets and eave an overhang to create a seating area.
Let's have a look at what that would look like side on. As we saw earlier the most comfortable clearance for seating an overhang for 15 inches / 38cm is required.
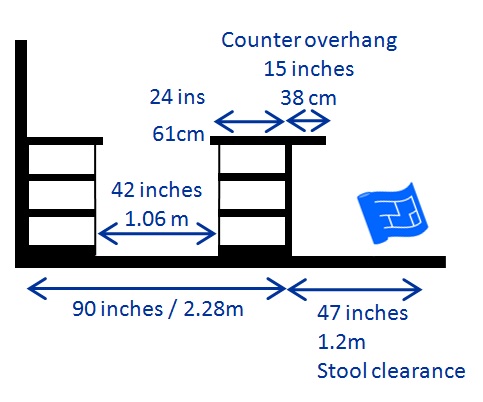 Section view of a slighty wider than 3ft / 91cm deep island with seating the whole length of the island
Of course you might find that changing the surface height of the overhang will work better for you.
How about adding a divider?
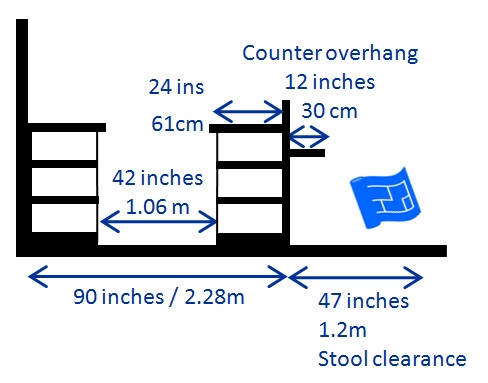 A divider added to this 3ft / 91cm deep island hides the kitchen surface from the space beyond the kitchen
Let's see what an overhang at bar height looks like.
Another alternative is to include a cut out area in the island for seating.
Here's a door plan for the arrangement above.
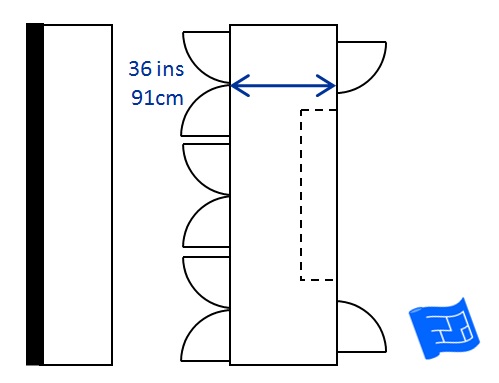 Door plan of a 3ft / 91cm deep island with a cut out seating area in the central portion of the island
A mistake to avoid
This is obvious in hindsight but when you're designing your island, or any other part of your countertop for that matter, make sure that you will be able to get in into your kitchen. Make sure it will fit through the door, and if you're in an apartment will it fit up the stairs or in the lift?
Kitchen island designs - 4ft / 1.2m deep
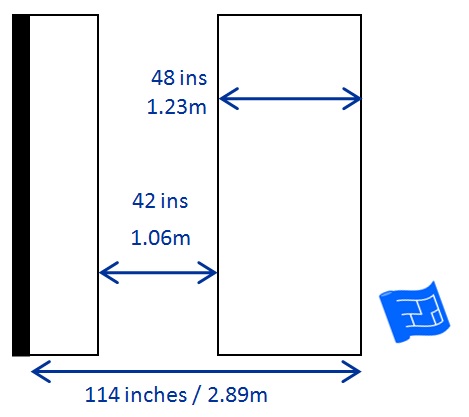
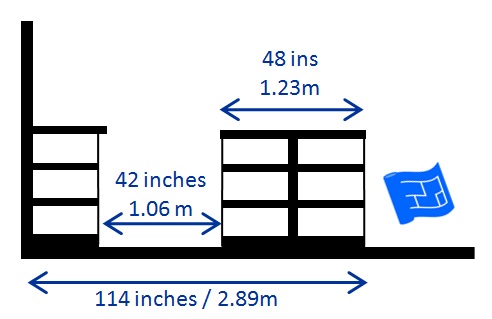
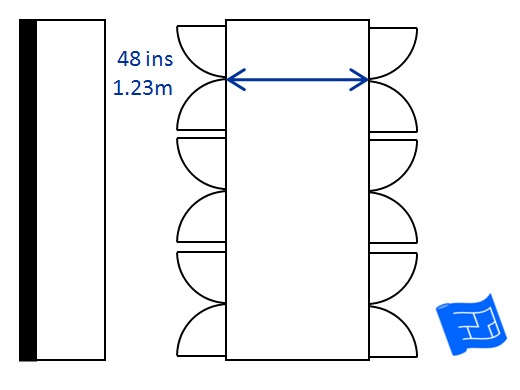
In this arrangement base cabinets are used on both sides of the island.
This is how this depth of island looks from the side.
Here's a few door plans for the above arrangement.
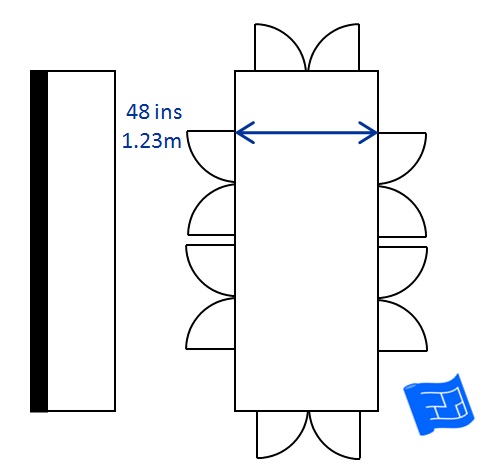 Door plan for a 4ft / 1.23m deep island featuring some storage accessed on the shorter edges of the island
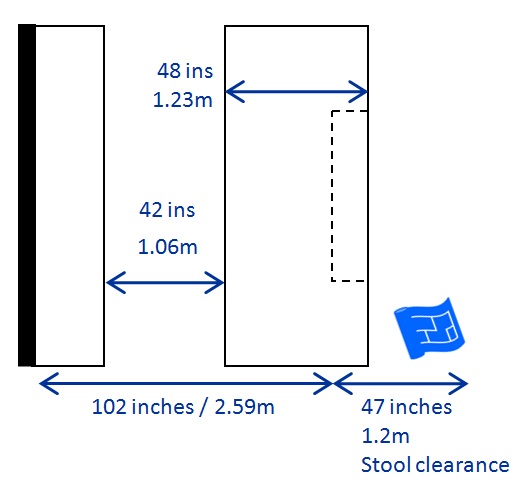
If seating is required, a slimmer cabinet can be substituted on the appropriate side for the length of the run of the seating.
Let's see what that looks like from the side.
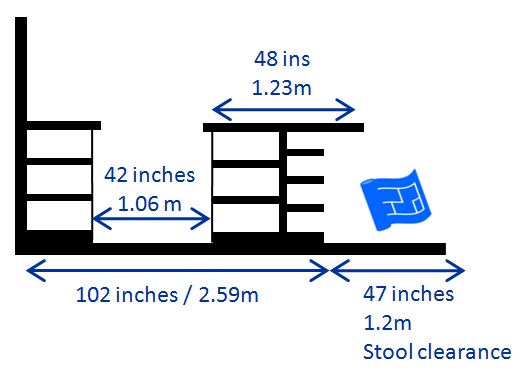 Section view of a 4ft / 1.23m deep island with seating along the length of the island with the surface at countertop height
You can choose to have the surface height of the seating area at a different height to the rest of the island.
In the example below, the counter for the seated area is at table height.
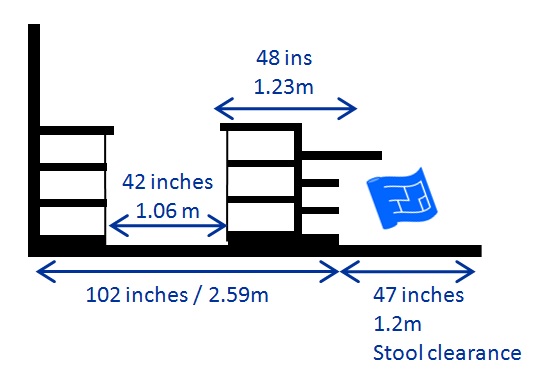 Section view of a 4ft / 1.23m deep island with seating along the length of the island with the surface at table height
Another option would be bar height.
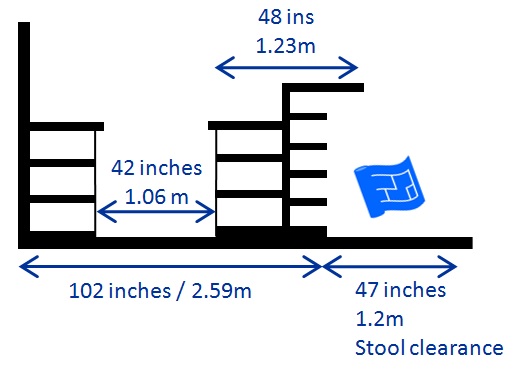 Section view of a 4ft / 1.23m deep island with seating along the length of the island with the surface at bar height
Or you can decide to have a cutout seating area.
Deeper kitchen islands
Deeper kitchen islands are of course possible, but it leaves a dead space in the middle of the island. If you have plenty of space this isn’t a problem.
More Kitchen Island Shapes
All the examples above have been for a rectangular island, so let's explore a few other options for kitchen island shape.
In the picture below the shape of the island become gradually more curved. When it comes to cabinets, curves generally mean more expense. Some manufacturers will have curved cabinets available as part of the range in which case you could have a kitchen island design with a straight edge and rounded at the ends.
A full oval shape would be very expensive to build and is likely to require custom cabinetry.
Now let's look at an island that's curved on one side. The thing about curves is that it's often only possible with custom built cabinets if you want to include cabinets along the curved edge. If you're not going to go to the expense of custom cabinets then a good trick is to have one side of the island in a shape that's suitable for off-the-shelf cabinets, then you can get the countertop of the island cut to include a curve. Below, this is demonstrated in the right hand example.
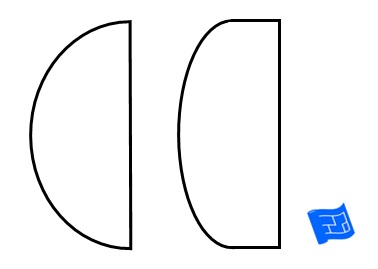 Two options for a curved shaped kitchen island. The example on the right is more suitable for off-the-shelf cabinets.
Similar logic applies if you need a triangular shaped island to deal with an angle in your kitchen design.
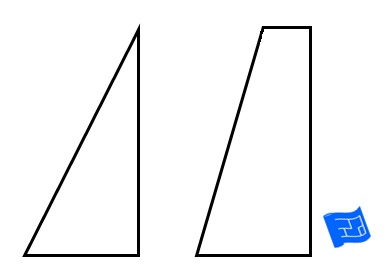 Two options for a triangular shaped kitchen island. The example on the right is more suitable for off-the-shelf cabinets.
Power and Lighting
There are some options for the power sockets on your island on the how to design a kitchen page.
And don't forget to check out the kitchen lighting ideas page to see how your kitchen island lighting can contribute to your kitchen ambience.
Examples of Kitchen Island Design
This page wouldn't be complete without a few real life examples. I've written a few notes which reflect the discussion on this page.

